A campaign is ready to go, but the list came from an old CRM export, a signup form, or a recent event. You need to find addresses that are malformed, stale, or risky before they reach the send queue, without making a slow, fragile API call for every row or accidentally suppressing good contacts.
A bulk email verification API turns list cleaning into a backend workflow: submit addresses, track a job, retrieve structured results, and use each verdict to decide whether a row can be sent, held, or suppressed. The integration is only useful if it also protects your data, handles ambiguous responses safely, and preserves the link between each result and the original record.
Table of Contents
- Keeping Batch Data Private and Retained Briefly
- How to Authenticate and Submit a Bulk Job
- Request Format and Reading Each Response Field
- Sample Code and SDK Options
- Handling Errors, Retries and Rate Limits
- Verdicts Your Code Must Handle Before Sending
- Build a Send Gate That Protects Your Reputation
- Run a Small Test Batch Before You Scale
Keeping Batch Data Private and Retained Briefly
A bulk job is a data transfer before it is a deliverability tool. Send the API only what it needs: an email address and a stable row ID. Names, purchase history, phone numbers, and campaign notes do not help determine whether an address can receive mail, so leave them in your own systems. Use a pseudonymous job ID in application logs; if a log is exposed, it should not reveal which customer or prospect was checked.
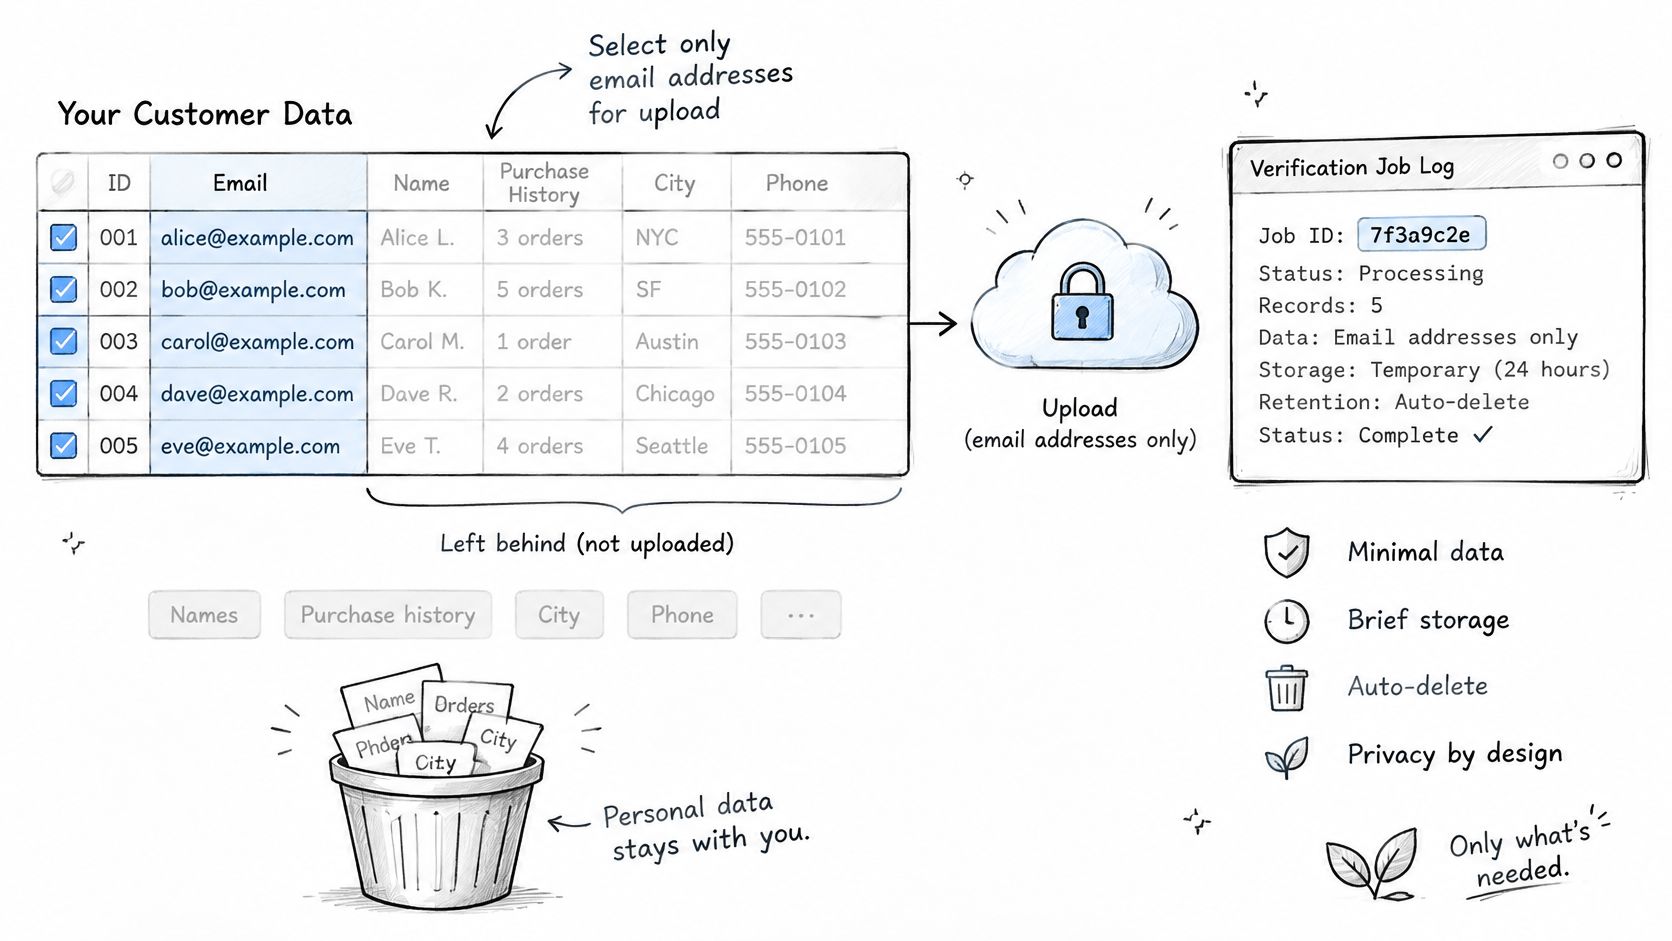
Verification stops before a message is sent, so the contacts on the list never receive an email from CleanMyList. The address still leaves your environment and goes to an external service. A mailbox check is not an email campaign, yet transferring personal data still deserves a security review. When comparing vendors, published privacy and data handling terms are the kind of document to read before any list leaves your environment.
Review processing and retention terms
Start with the data-processing terms, not the API's throughput claims. Confirm where processing happens, whether region restriction is available, how long submitted lists and results are retained, and how the provider demonstrates deletion. CleanMyList encrypts customer data and deletes lists after 30 days; check that those commitments are reflected in the applicable data-retention information and processing terms for your use case.
Then establish that you are entitled to submit the list. Verification requires a legitimate sender relationship, such as your own list, a customer list, or a list processed under a Data Processing Addendum. Do not upload a purchased or scraped list just because the endpoint accepts it. Technical permission to make a request is not permission to contact the people on that list.
Minimize repeated exposure
For sensitive or regulated contacts, decide whether verification is necessary before sending anything to a third party. Keep suppression lists separate from the batch being checked: use them to filter records locally, and do not upload the full suppression file unless there is a specific, reviewed reason. Record who initiated each job, why it was run, and when the result can be deleted.
Rechecking can reduce stale-data risk, but it means transferring the same addresses again. Lists decay as people change jobs, abandon inboxes, let domains lapse, or stop using role addresses, so verification can become a lifecycle task rather than a one-time migration step. Each repeat check still needs a clear purpose. For many teams, a signup-time check plus targeted reviews of aged lists is a better balance than repeatedly uploading every contact.
How to Authenticate and Submit a Bulk Job
Treat the API key like a production database credential. Keep it on your server, submit over HTTPS, and persist the job identifier before your worker moves on. The code below is provider-neutral: endpoint paths and request fields are examples, so match them to the API reference before using them.
-
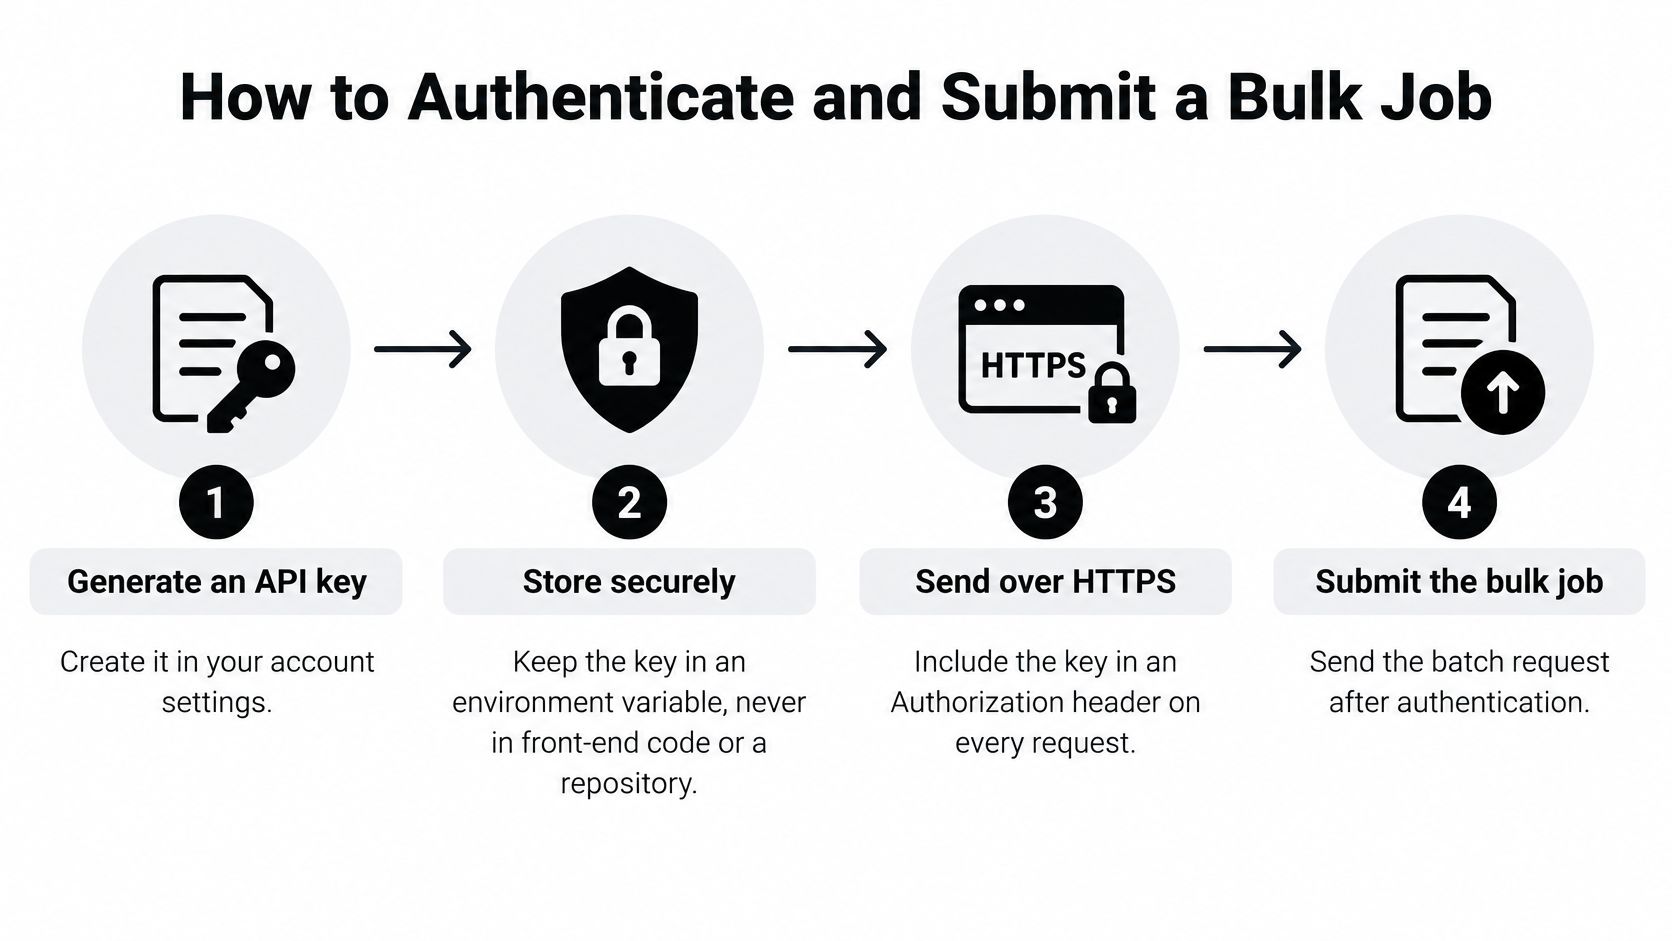
Generate an API key. Create it in your account settings and give it only the access the integration needs. Separate development and production credentials so a test environment can't become a production dependency.
-
Store it securely. Read the key from an environment variable or secrets manager, never from front-end code or a repository. If it appears in logs, a commit, or a browser bundle, rotate it rather than assuming nobody saw it.
-
Send it over HTTPS. Include the key in an
Authorizationheader on every request. Don't put credentials in query parameters, where proxies and request logs may capture them. -
Prepare the rows. Trim surrounding whitespace and remove duplicate addresses before submission, while keeping the original row ID. Duplicates waste verification work and make the results harder to interpret.
-
Chunk the input. Split large files to fit the provider's documented batch limits, and record the chunk ID alongside your import job. A failed chunk can then be resumed without restarting the entire list.
-
Submit idempotently. Include an idempotency key when the API supports one. If your client times out after the server accepted the request, retrying with the same key helps prevent an accidental duplicate job.
-
Track completion. Save the returned job ID as soon as the submission succeeds, then use a completion webhook if the provider offers one or poll at a modest interval. Aggressive polling adds load without making the verification finish sooner.
-
Fetch and join results. Retrieve the completed results and match each result to your database by row ID, never by its position in a file. Sorting, retries, or partial failures can change row order.
The workflow is asynchronous, so the result of submission is usually an acknowledgement rather than the verdicts themselves. A successful submission means the provider accepted a job; it doesn't mean every address has already been classified.
Here's the shape of the process before you wire in your real endpoint names:
1. Generate a key in account settings.
2. Store it outside the codebase.
3. Send a small authenticated batch over HTTPS.
4. Save the returned job ID.
5. Fetch results and join them to your own row IDs.
A sample request should include a stable row ID for every address, an idempotency key for the job, and only the fields the API requires. Start with a 50-row sample, confirm that every row ID returns intact, and check that a retry doesn't create a second job. Only then process the full list.
This is also a good place to see the sequence laid out visually:
Request Format and Reading Each Response Field
For a signup form, a single-address request can send one email in a JSON body and return its result in the same response. That synchronous pattern is useful when your application needs to respond to one person; a batch job is a better fit for a list, where each input row should carry both an email and a stable row ID.
The first check is syntax. RFC 5322 defines the local part before the @ and the domain part after it; the local part may contain up to 64 characters, and the complete address is commonly constrained to 254 characters for practical Internet use (RFC 5322 email validation overview). A parser can reject a missing part, two @ symbols, spaces, invalid punctuation, consecutive dots, or a local part that begins or ends with a dot before it makes DNS or mailbox queries.
Next, the API checks the domain. The domain check confirms that the part after the @ has a working mail server. Only after these foundational checks do DNS and mailbox signals help distinguish a nonexistent address from cases such as a catch-all domain, a disposable provider, or a role account. Addresses from known temporary email services built to disappear are flagged.
| Field | Example Value | How to Use It |
|---|---|---|
status |
valid |
Drives the send, hold, or skip decision. |
raw_reason |
550 user unknown |
Keep for support and audits; never show to end users. |
is_disposable |
true |
Skip the row or flag it at signup. |
is_role |
true |
Route shared mailboxes to review. |
is_catch_all |
true |
Apply the throttled cohort rule. |
row_id |
1042 |
Join the result back to your database record. |
job_id |
Value returned at submission | Track the batch and fetch its results. |
These field names are illustrative; map the actual response schema in your provider's API reference. For a worked example, suppose a batch request sends row_id 1042 with ana@example.com and returns job_id job_8841 with status queued. The later result for row 1042 says invalid, with raw_reason 550 user unknown and is_disposable set to false. Store the reason for internal support, then have the send gate suppress that row.
A practical integration treats the response as structured decision data, not just a green or red badge. If you're comparing how providers expose these signals before a campaign workflow, this guide to verifying addresses before campaigns offers a useful point of comparison.
Sample Code and SDK Options
Keep the HTTP layer thin. Put authentication, request construction, retries, and result parsing in one client so the signup path and batch worker don't develop different interpretations of the same API response. The examples below use placeholder URLs and illustrative endpoint paths; replace them with the exact paths and parameters in your provider's documentation.
cURL submission:
export API_KEY="YOUR_API_KEY"
export API_BASE_URL="YOUR_API_BASE_URL"

curl -sS -X POST "$API_BASE_URL/YOUR_BULK_ENDPOINT" \
  -H "Authorization: Bearer $API_KEY" \
  -H "Content-Type: application/json" \
  -H "Idempotency-Key: import-2026-11-chunk-01" \
  -d '{"rows":[{"row_id":"1042","email":"ana@example.com"}]}'
The idempotency header matters when a connection drops after submission. Capture the response's job ID and persist it with the import state before the worker makes another request.
Python submission with bounded retries:
import os
import random
import time
import requests

base_url = os.environ["API_BASE_URL"]  # Set from the provider's docs.
api_key = os.environ["API_KEY"]

rows = [{"row_id": "1042", "email": "ana@example.com"}]
headers = {
    "Authorization": f"Bearer {api_key}",
    "Idempotency-Key": "import-2026-11-chunk-01",
}
url = f"{base_url}/YOUR_BULK_ENDPOINT"

for attempt in range(4):
    response = requests.post(
        url, json={"rows": rows}, headers=headers, timeout=30
    )
    if response.status_code not in (429, 500):
        response.raise_for_status()
        job_id = response.json()["job_id"]
        save_job_id(job_id)  # Persist before doing more work.
        break

    wait = min(2 ** attempt, 30) + random.random()
    time.sleep(wait)
Use this pattern only if the provider's documented response supports the job field shown here. The retry loop is deliberately limited to 429 and 500; a malformed payload or bad credential needs a fix, not another identical request.
Node.js result retrieval:
const base = process.env.API_BASE_URL;
const key = process.env.API_KEY;

const sleep = ms => new Promise(resolve => setTimeout(resolve, ms));
const headers = { Authorization: `Bearer ${key}` };

let job;
do {
  await sleep(15000);
  const response = await fetch(`${base}/YOUR_JOB_STATUS_PATH`, { headers });
  if (!response.ok) throw new Error(`Status request failed: ${response.status}`);
  job = await response.json();
} while (job.status !== "completed");

const resultResponse = await fetch(`${base}/YOUR_RESULTS_PATH`, { headers });
if (!resultResponse.ok) throw new Error("Could not fetch verification results");
const results = await resultResponse.json();

for (const result of results) {
  await updateRecordById(result.row_id, result);
}
Check for an official SDK in your language before maintaining your own client. If there isn't one, a small HTTP wrapper with explicit timeouts, safe retries, and row-ID joins is enough. Never log the API key, and validate all paths and parameter names against the API reference before running live requests.
Handling Errors, Retries and Rate Limits
Separate HTTP request failures from verification verdicts. A request can fail before the API processes your batch, while a successfully completed request can return invalid or unknown for an address. Mixing those cases leads to bad retries and misleading reports.
| Status | Meaning | What to Do |
|---|---|---|
400 |
Malformed request or body | Fix the payload; don't retry unchanged. |
401 |
Missing or invalid API key | Check the key and header; stop retries until fixed. |
429 |
Rate limit reached | Wait for the Retry-After period, then retry with backoff. |
500 |
Provider-side server error | Retry with exponential backoff and jitter. |
| Request limit per minute | The provider's documented request ceiling | Read the documented limit before sizing concurrency. |
For 400, inspect the body and correct the bug. For 401, check the configured credential and Authorization header, then alert the team; repeating the same request won't repair a revoked or mistyped key. With 429, honor Retry-After if present, then resume rather than creating a new job. For a 500, use exponential backoff with random jitter, cap the wait, and set a maximum retry count.
A request that already returned a job ID isn't a failed submission, even if a later status check times out. Don't submit the batch again as a workaround. Resume by checking that existing job, and log retries with their idempotency keys so you can trace any duplicate work.
Shape the queue around real limits
Rate limits vary by plan, so read the documented per-minute and per-day ceilings before sizing worker pools. Use a queue that slows down when the limit is reached instead of dropping work. Cap parallel requests per destination domain, and cache DNS responses only within their time-to-live limits.
A practical retry policy also considers how email servers behave. The SMTP process may involve a staged connection and mailbox check, but a successful SMTP response alone doesn't prove that a mailbox exists. Temporary failures, greylisting, and provider rate limits can produce ambiguous results; effective systems preserve the raw reason and retry transient failures with backoff (SMTP verification and deliverability guidance).
Keep work resumable at the chunk level. When a limit is reached, pause the queue, record the last confirmed chunk, and continue from there after the wait. For a deeper look at preventing sender reputation damage, the same basic discipline applies: control the pace instead of forcing repeated requests through a constrained system. Keep your API error and status handling explicit enough that an operator can tell a credential problem from a temporary service fault.
Verdicts Your Code Must Handle Before Sending
A verdict is a send, hold, or skip decision, not a yes-or-no label. A syntactically valid address can still fail at the domain or mailbox stage, and an SMTP server that accepts a recipient doesn't necessarily confirm that the mailbox exists.
| Verdict | What It Usually Means | Action in Your App |
|---|---|---|
valid |
Syntax, domain, and mailbox checks passed with no risk flags | Send. |
invalid |
Syntax, domain, or mailbox check failed | Suppress and don't retry the same address. |
unknown |
Ambiguous server answer such as greylisting, a policy block, or a rate limit | Hold and re-verify later; don't send. |
catch_all |
Domain accepts any address, so the mailbox can't be confirmed | Send only in a small throttled cohort and watch bounces. |
disposable |
Address belongs to a known throwaway email provider | Skip. |
role_account |
Shared mailbox such as info@ or sales@
|
Review by campaign type before sending. |
Map server replies carefully before assigning a verdict. A 5xx response can indicate a permanent failure and support an invalid result; a 4xx response is temporary or inconclusive and may support unknown. A 250 response is not proof of a mailbox: catch-all servers can accept arbitrary recipients, and some providers obscure recipient checks to prevent enumeration.
Default safely: If your code doesn't recognize a returned state, hold the row for review. Never let an unknown or new status fall through into the send queue.
Verification also doesn't establish permission to contact someone, engagement, domain authentication, content quality, or inbox placement. A dataset of 7,530,489 B2B cold emails from 2025 reported a 1.71% bounce rate, and the analysis links high bounce rates to sender-reputation damage (Belkins' email deliverability analysis). Treat address-level results as one input to a campaign decision, alongside consent records, suppression lists, complaint history, and the state of your sending domain.
Store the verdict and raw reason with every row so an operator can investigate unusual outcomes without exposing server messages to end users. Use the verdict definitions and actions as a starting point for mapping provider-specific statuses to your application's own send, hold, and skip rules.
Build a Send Gate That Protects Your Reputation
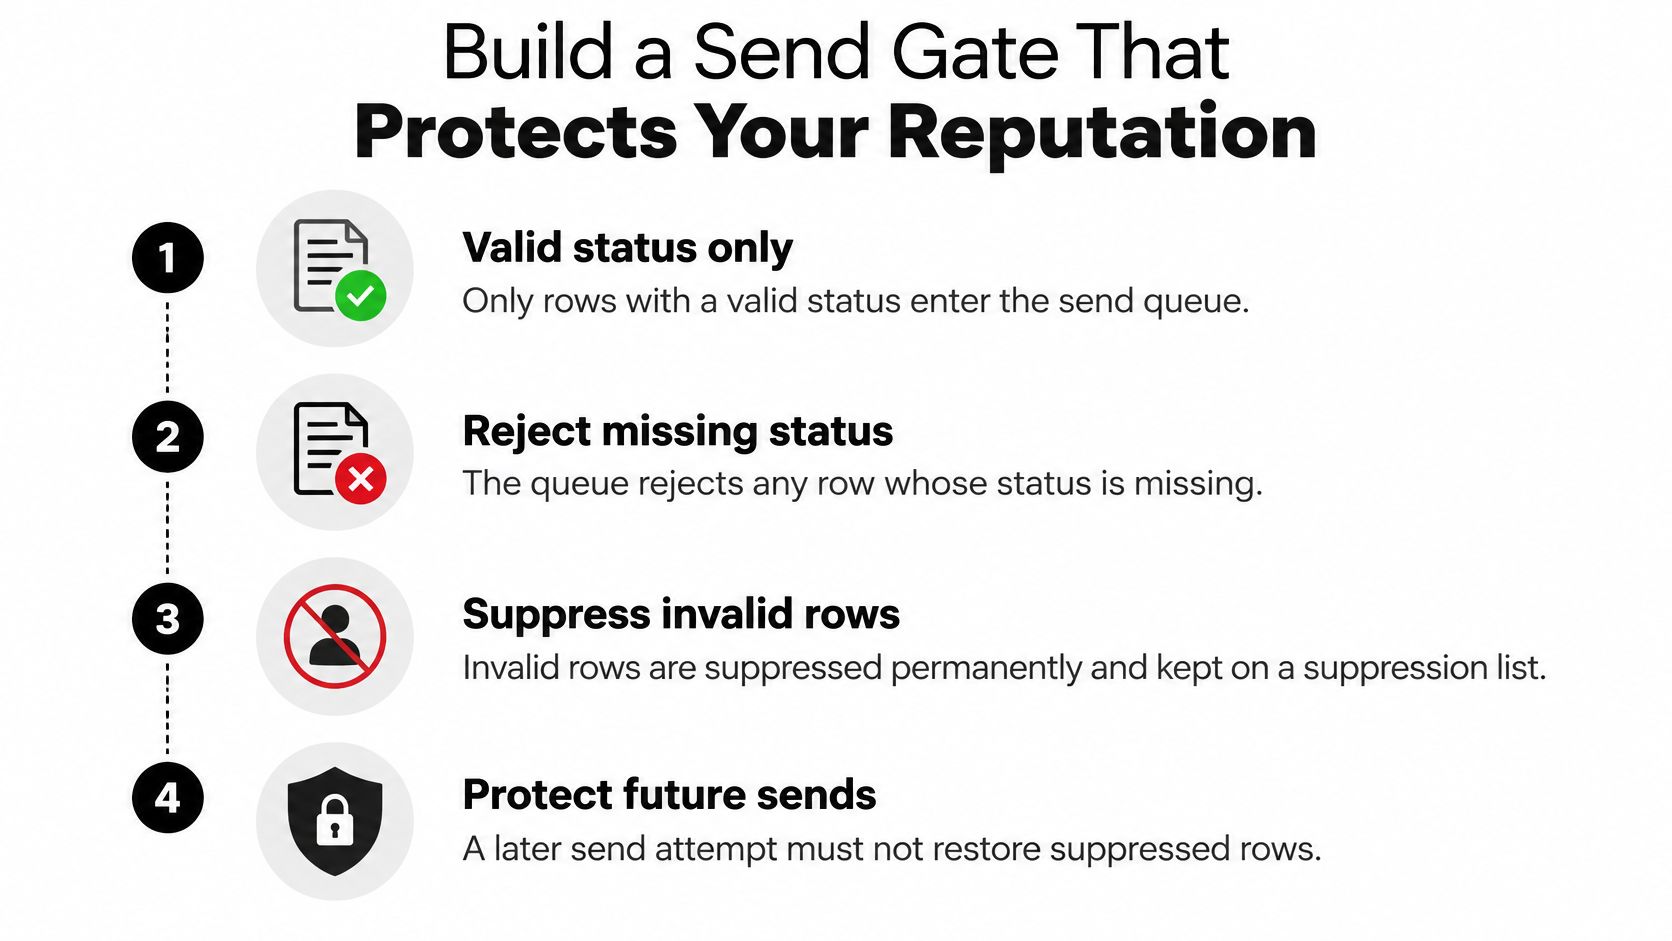
The send gate should be a small, enforceable part of the application, not a convention that each campaign owner interprets differently. Store the verification status on the row and make the queue check it at the moment a campaign is assembled.
-
Allow only
validrows into the normal send queue. If the status is missing, reject the row and require verification or review before it can be scheduled. - Keep invalid rows suppressed. Store them in a suppression list so a later import can't add the same address back into a campaign without detection.
- Put catch-all rows in a capped cohort. Start conservatively, monitor delivery outcomes, and pause the cohort if bounces rise sharply.
- Check the age of the result. Re-verify an aged list before a campaign because mailbox status changes over time; don't treat a past verdict as permanent.
- Require consent separately. A mailbox verdict doesn't record permission to send, so the gate should also check the consent or other applicable sender relationship recorded for the contact.
Authentication is a separate control from recipient-list verification. Google and Yahoo's 2024 bulk-sender requirements generally apply to senders sending more than 5,000 messages per day to their consumer accounts, and include SPF and DKIM authentication, a DMARC policy, one-click unsubscribe, and low spam-complaint rates (overview of Google and Yahoo bulk-sender changes). A clean recipient list won't compensate for a sending domain that isn't configured to meet the applicable requirements.
Before launch, review the gate as a team:
- List status: Every queued record has an accepted status; missing and invalid results are blocked.
- Suppression: Previously suppressed addresses can't re-enter through a fresh import.
- Risk lanes: Catch-all and role-account policies are set for this campaign type.
- Permission: The relevant consent or sender relationship is recorded.
- Domain readiness: SPF, DKIM, and DMARC are in place, with unsubscribe handling and complaint monitoring checked.
Run a Small Test Batch Before You Scale
Test classification quality, not just whether the API returned a response. Build a sample that reflects the list you'll send: include consumer, business, regional, and enterprise domains, then reserve a blinded holdout whose verdicts the sending team won't see until delivery outcomes are available.
Compare the API's classifications with observed outcomes. Track precision, recall, unknown rate, latency, and provider-specific error rates. Don't treat the percentage of invalid addresses in a pre-send verification as your bounce rate: those addresses weren't sent to, so you don't know how they would have behaved in a campaign. Instead, compare results against delivered, bounced, and otherwise observed outcomes for addresses that were sent.
Prioritize avoiding false-valid classifications. A false invalid can suppress a possible contact, but a false valid can cause a hard bounce and damage the sender's reputation. Set your own acceptable unknown rate and bounce threshold before the test, and treat unknown as a hold outcome rather than forcing it into a pass or fail. Keep the original input row and use an idempotency key for each batch so the sample remains auditable (bulk email list-quality benchmark guidance).
For a concrete first run, take a 200-row sample this week and pass it through both the batch pipeline and the signup check. Record the verdicts, errors, and subsequent delivery outcomes in a spreadsheet. Move the full list only when the unknown rate and observed bounce results fit the targets you set.
CleanMyList offers one-at-a-time and large-batch email verification, with results you can use to route records before a campaign. Upload a CSV, paste addresses, or connect a signup flow, then visit CleanMyList to test the workflow with your own list.