At least 23% of an email list degrades within one year, and Gmail can show a question mark beside an unauthenticated sender. Since 2024, Google has required bulk senders to use SPF, DKIM, and DMARC, making sender verification a trust and compliance requirement, not just a bounce-prevention tactic.
You may be dealing with either problem right now. You reply to a familiar-looking message and later discover that the address was spoofed. Or your own campaign starts bouncing because the domain is only partially authenticated and the recipient list contains stale mailboxes. These situations look similar in an inbox, but they require different checks.
“Email verify sender” covers two separate jobs:
- Verify your own sending infrastructure, so mailbox providers can confirm that your messages are authorized.
- Verify incoming sender identity, so you can decide whether a received message is authentic before trusting links, attachments, or replies.
List hygiene belongs alongside both tasks, but it isn't the same task. A clean recipient list won't authenticate your domain, and a valid SPF record won't prove that every address on your list still exists.
Table of Contents
- Why Email Verify Sender Identity Now Matters More Than Ever
- Setting Up SPF DKIM and DMARC for Sender Authentication
- Testing SMTP Reachability and Return Path Validation
- How to Inspect Email Headers and Verify Incoming Senders
- Pre Send Verification Workflows to Protect Sender Reputation
- DNS Only Versus SMTP Verification Accuracy Comparison
- Building a Complete Email Verify Sender Strategy
Why Email Verify Sender Identity Now Matters More Than Ever
Gmail gives users a visible warning signal when authentication is missing. Its guidance explains that an unauthenticated message may show a question mark next to the sender name, and recommends checking SPF, DKIM, and the Authentication-Results header before deciding whether the message is genuine. That small icon changes the recipient's behavior. A reader who might have replied automatically now has a reason to pause.
Google and Yahoo introduced bulk-sender requirements around SPF, DKIM, and DMARC in 2024, connecting sender identity with inbox access and abuse prevention. The practical implication is straightforward: you need to prove that your sending service is authorized, that the message carries a valid signature, and that receiving providers know what to do when those checks fail. Authentication doesn't guarantee inbox placement, but incomplete authentication creates an avoidable trust problem.

Two meanings of sender verification
The first meaning is outbound domain authentication. You publish DNS policies and configure your mail platform so recipients can validate the origin of your messages. This protects your brand from impersonation and gives mailbox providers consistent signals about legitimate traffic.
The second meaning is incoming message verification. You inspect the visible From address, the return path, SPF and DKIM results, alignment, and the receiving provider's authentication summary. A message can display a familiar name while failing to authenticate the domain behind it.
Recipient-list verification answers a different question: will this address probably accept mail? That matters because a 2026 list-decay analysis found that at least 23% of an email list degrades within one year, while invalid addresses were the most common risky category and catch-all addresses were the second-largest source of potential bounces (ZeroBounce's list-decay analysis). The same report said only 62% of submitted emails were valid in 2025, so more than one in three addresses entering verification workflows may be risky, stale, or unusable.
Practical rule: Authenticate your domain to establish who you are. Verify recipients to avoid sending to addresses that can't receive you. Inspect incoming headers before you trust another sender.
Setting Up SPF DKIM and DMARC for Sender Authentication
A reliable authentication stack starts with the domain you control, not with the recipient list. Set up each protocol in sequence, then test the headers produced by a real message.
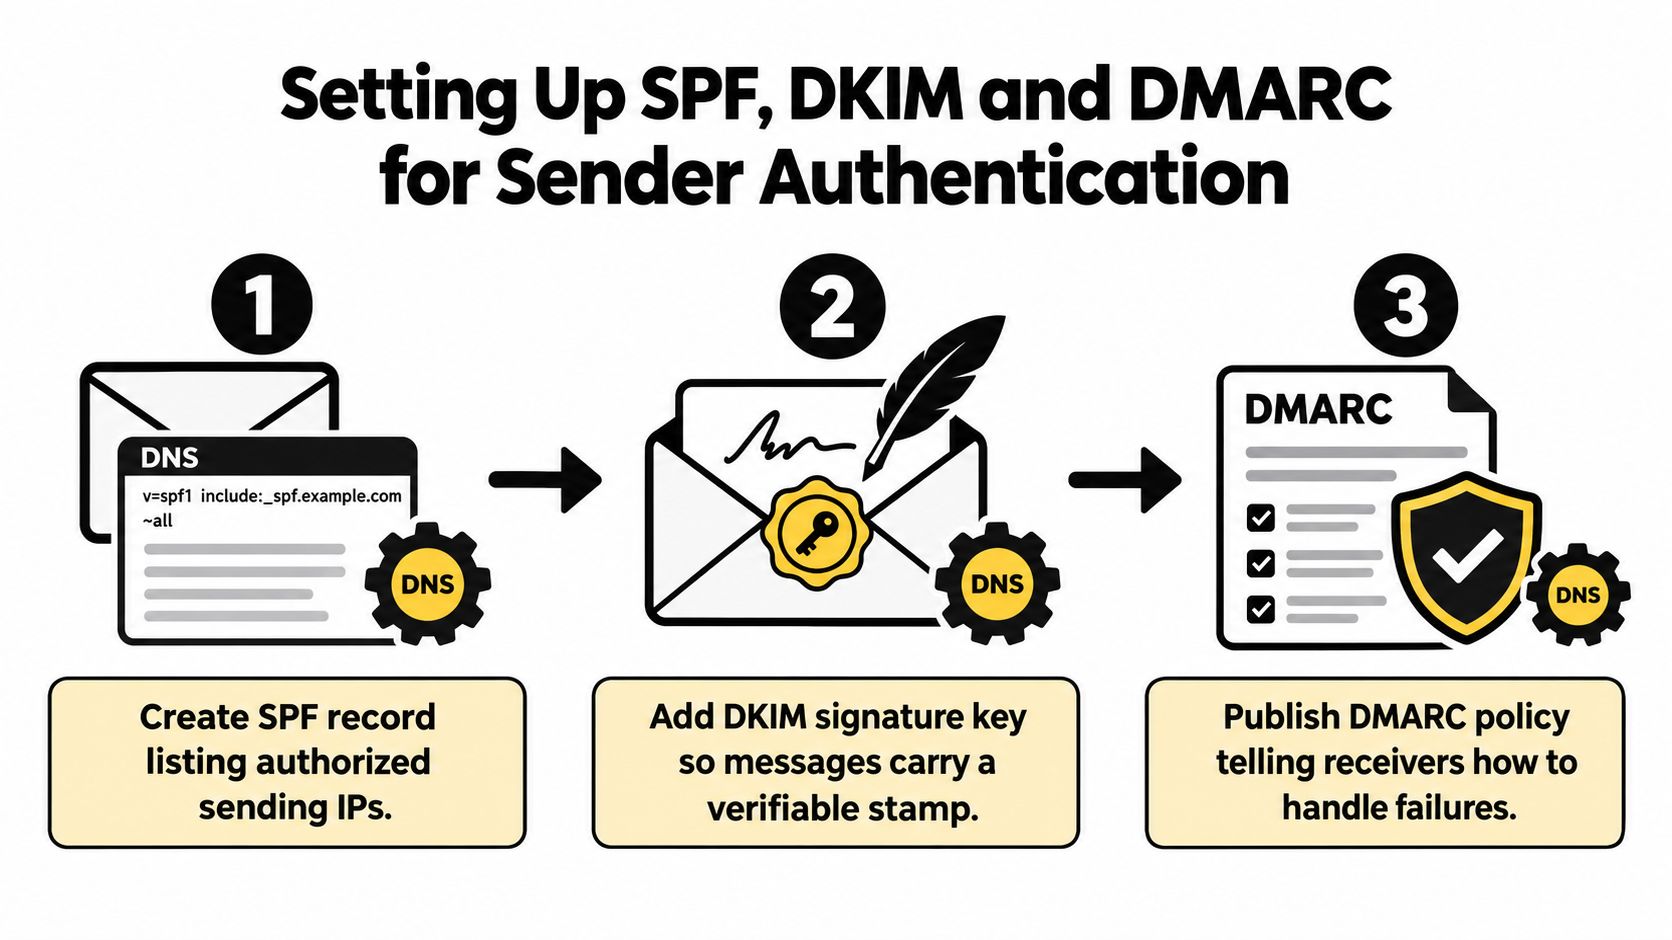
Publish an accurate SPF policy
SPF tells receiving servers which systems are authorized to send mail for your domain. Start by listing every legitimate sender, including your email service provider, transactional platform, support system, and any separate marketing infrastructure.
The common operational mistake is forgetting a service after a migration. Another is creating multiple SPF records instead of consolidating authorized sources into one policy. SPF also has a ten-lookup limit, so nested includes and overly broad provider lists can cause a PermError even when the record looks correct at a glance. Keep the record deliberate, remove obsolete services, and review it whenever your sending stack changes.
Add DKIM signing
DKIM attaches a cryptographic signature to outgoing messages. The receiving server retrieves the public key from DNS and checks whether the signature matches the message and the claimed signing domain.
Your email platform usually generates the key pair and supplies the selector record. Publish the public key exactly as provided, then send a test message through every relevant stream. Misaligned selectors, missing DNS records, key rotation errors, and a platform that isn't signing all cause failures that won't be fixed by changing SPF.
For a complementary explanation of domain and mailbox checks, use this guide to email address domain validation. Domain existence is useful, but it doesn't replace message signing or policy enforcement.
Use DMARC as the control layer
DMARC connects SPF and DKIM to the visible From domain and tells receiving systems how to handle failures. Start with a monitoring policy while you identify legitimate senders and repair alignment. Move toward quarantine or reject only after reports show that valid traffic passes consistently.
A cautious rollout usually follows this pattern:
- Monitor first: Collect reports and identify unknown sending sources.
- Quarantine selectively: Ask providers to treat failed messages as suspicious.
- Reject with confidence: Block unauthenticated messages once legitimate streams are aligned.
Test messages from your marketing platform, CRM, support desk, and application. A domain can pass authentication for one stream while failing for another because each service uses different return paths, signing domains, or configuration settings.
Testing SMTP Reachability and Return Path Validation
Authentication tells a recipient that your infrastructure is authorized. SMTP verification tests whether a specific recipient domain and mailbox respond at the delivery layer. That distinction matters because a domain can have functioning DNS and still contain nonexistent addresses.

Test the receiving path, not just the domain
Begin with syntax, then resolve the domain's MX records and connect to the receiving server. A mailbox-level check uses the SMTP conversation to test whether the server recognizes the recipient without sending an actual message. Record the response from each relevant MX host, because one server may respond differently from another.
Timing provides useful diagnostic context. A slow response can indicate throttling, greylisting, temporary availability problems, or a provider that deliberately obscures mailbox existence. Don't turn a delayed response into an automatic invalid verdict. Mark it as uncertain and retry according to your risk policy.
You can use the workflow described in MX record verification to separate domain routing problems from mailbox-level uncertainty.
Validate the return path
The Return-Path receives delivery-status notifications and bounce messages. It must route to an address or service your sending system can process. If the return path is misconfigured, you may lose the feedback needed to suppress hard bounces, investigate blocks, and maintain accurate delivery records.
Check that the return-path domain is authorized, monitored, and aligned with your operational process. A visible From address can look correct while the envelope sender points to an unmanaged domain. That mismatch complicates bounce handling and can create authentication alignment problems under DMARC.
Catch-all domains need their own policy. An accept-all server may return the same positive response for a real mailbox and a fabricated one, so a positive SMTP response isn't definitive proof of deliverability.
A practical test should therefore combine:
- SMTP response analysis: Evaluate recipient responses rather than relying only on DNS.
- MX timing: Flag slow, inconsistent, or temporary server behavior.
- Catch-all detection: Test a controlled nonexistent address to identify accept-all behavior.
- Return-path review: Confirm that bounces reach the system responsible for suppression and analysis.
This video provides a visual introduction to the verification process:
How to Inspect Email Headers and Verify Incoming Senders
If the question is “can I trust this email?”, don't start with the message body. Start with the headers.
In Gmail, open the message details and inspect the sender information, then view the full message headers. Look for Authentication-Results, which may show separate results for SPF, DKIM, and DMARC. A pass is useful only when it applies to the relevant domain and aligns with the identity shown in the From field.
Read the signals together
SPF checks whether the sending server was authorized for the envelope or return-path domain. DKIM checks whether the message carries a valid signature from the signing domain. DMARC evaluates whether those authenticated domains align with the visible From domain and applies the sender's published policy.
Don't treat a familiar display name as proof. Compare the visible address with the organization's actual domain, inspect reply-to differences, and look for unexpected subdomains or lookalike spellings. A message can pass one technical check and still deserve caution if the authenticated identity doesn't match the brand the sender claims to represent.
Gmail's own guidance says users should review the question-mark indicator and the Authentication-Results header when a message appears unauthenticated (Gmail's sender-authentication guidance). If SPF, DKIM, or DMARC fails, don't reply, open an attachment, or follow a login link until you verify the request through a separate trusted channel.
A failed check isn't always proof of fraud. Forwarding, mailing lists, and misconfigured third-party senders can break authentication. The correct response is to weigh the header results, domain alignment, message context, and requested action together.
Pre Send Verification Workflows to Protect Sender Reputation
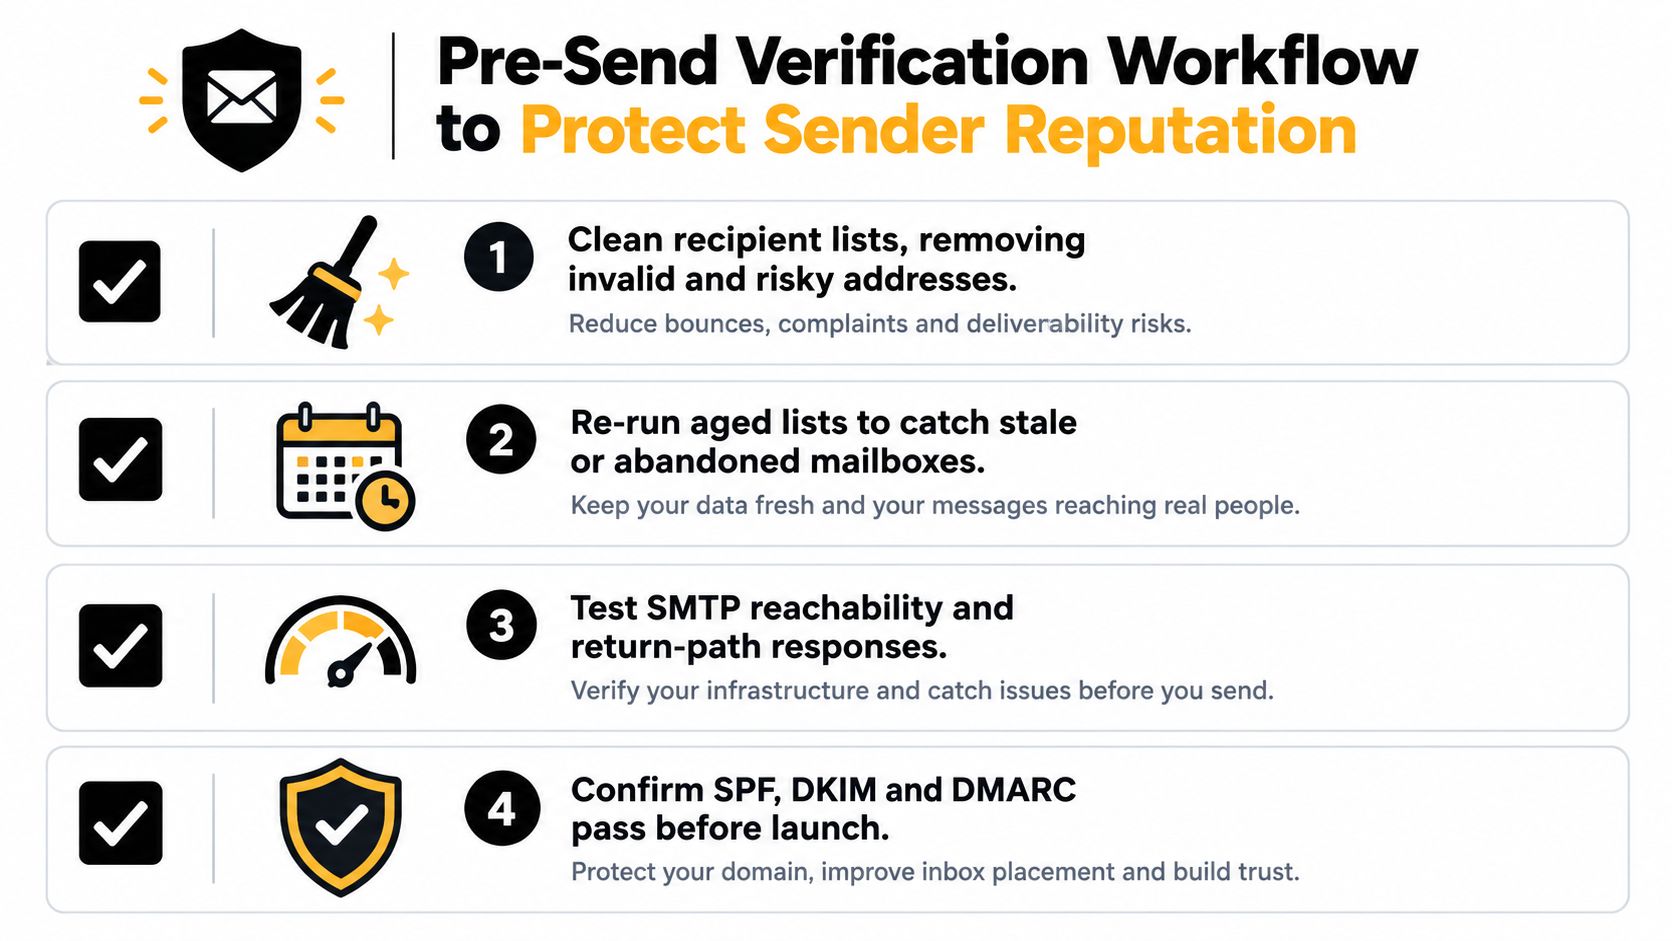
A pre-send workflow should stop bad data before it reaches the campaign platform, then confirm that your own authentication still works. Run it at acquisition for new addresses, before important sends, and again when a list has aged.
Use a layered decision process
- Normalize and check syntax. Catch malformed addresses, whitespace, obvious typos, and duplicate records before deeper testing.
- Validate DNS and MX routing. Remove domains that don't resolve or lack a usable mail route.
- Probe SMTP carefully. Separate confirmed deliverable, undeliverable, temporary, and catch-all results. Don't force uncertain responses into a false yes.
- Apply risk scoring. Review disposable providers, role accounts, suspicious patterns, and historical bounce signals according to the campaign's tolerance.
- Verify your sending stack. Send a controlled test and inspect SPF, DKIM, DMARC, return-path, and alignment before launch.
The list-decay evidence makes rechecking important. An aged list can contain former employees, abandoned inboxes, expired domains, and addresses that once worked but now generate hard bounces. Keep the original list unchanged, export a decision field, and suppress rejected or uncertain records rather than deleting the source data.
Operational rule: Never let a single “valid” label decide a high-stakes send. Record why an address passed, failed, or remained uncertain.
The right depth depends on context. A low-risk internal notification may use syntax and DNS screening, while a large acquisition list or a valuable launch should use SMTP testing, catch-all handling, and a final authentication review. Whatever threshold you choose, apply it consistently and record the date of the last verification.
DNS Only Versus SMTP Verification Accuracy Comparison
DNS checks answer whether a domain appears able to receive mail. They don't reliably answer whether the specific mailbox exists. A mixed B2B benchmark illustrates the gap: DNS-only validation labeled 96.2% of 50,000 addresses as valid, while full SMTP verification reduced the true valid rate to 71.4%, an overestimate of 24.8 percentage points (EmailShield's DNS and SMTP comparison).
| Validation Method | Validity Rate | Failure Mode |
|---|---|---|
| DNS-only validation | 96.2% | Treats a functioning domain as evidence that individual mailboxes exist |
| Full SMTP verification | 71.4% | Produces more cautious results when servers reject nonexistent recipients |
| Difference in the benchmark | 24.8 percentage points | DNS-only checks overestimate mailbox validity |
The benchmark attributed the overestimate to nonexistent mailboxes on valid domains, catch-all domains, and disposable or role addresses. Catch-all behavior is especially difficult because the server may accept both real and fake recipients.
A separate benchmark reported 33.1% of verification attempts landing on catch-all domains while only 0.3% failed at the DNS level (BounceZero's deliverability benchmark). That pattern shows why domain checks alone remove relatively few bad addresses.
Use DNS-only checks for an early, inexpensive filter. Use SMTP verification when bounce risk matters, especially for aged, purchased, imported, or high-value lists. For more practical mailbox-existence checks, see this guide on how to check if an email address exists.
Building a Complete Email Verify Sender Strategy
A complete strategy has three operating lanes. Authenticate your sending domain with SPF, DKIM, and DMARC. Validate recipients with syntax, DNS, SMTP, catch-all handling, and risk signals. Inspect incoming messages through headers and alignment before you trust the sender or respond.
SMTP was standardized in 1982 through RFC 821, establishing the protocol foundation that later verification systems test against. A 2023 worldwide benchmark reported average bounce rates of about 1.5% for permission-based email marketing programs, with reported deliverability around 98.5% (Validity's email deliverability resources). Those figures don't make authentication optional. They show why senders need both sound infrastructure and disciplined list controls.
For teams managing prospecting data, a focused resource on email verification for B2B outreach can help connect acquisition workflows with mailbox validation. The important distinction remains the same: sender authentication proves who sent the message, while recipient verification helps determine whether the destination is usable.
Run the checks before launch, review failures instead of overriding them, and inspect headers whenever an incoming request feels unusual. Skipping either side leaves a predictable gap, spoofed messages can reach people, or your own infrastructure can send confidently to addresses that no longer exist.
CleanMyList lets you upload a CSV or paste addresses, then review syntax, DNS, SMTP mailbox existence, catch-all behavior, disposable providers, role accounts, bounce reputation, and a send-or-skip recommendation without sending test emails. Visit CleanMyList to clean a recipient list, recheck an aged file, or add one-at-a-time validation to signup before bad addresses enter your system.