In 2025, Kaspersky's spam and phishing report recorded more than 554 million attempts to follow phishing links worldwide. That's not a problem you solve by teaching staff to spot bad spelling. If you're asking how do I stop phishing emails in a small team, the answer is configuration first, process second and recognition last.
Table of Contents
- The Minimum Setup That Stops Most Phishing Emails
- How to Publish SPF, DKIM and DMARC Records
- A Ten-Second Check Staff Can Run on Every Request
- Train for Reporting and Measure the Right Numbers
- What to Do After Someone Clicks or Submits Credentials
- Confirm Your Setup and Keep Monitoring
The Minimum Setup That Stops Most Phishing Emails
In its 2024 Internet Crime Report, the FBI's Internet Crime Complaint Center recorded 859,532 complaints involving suspected internet crime and reported losses exceeding $16 billion, a 33% increase from 2023. Phishing and spoofing ranked among the three most frequently reported cybercrime categories. Those totals only cover reported complaints, so overall exposure is larger.
Recognition alone fails because a polished message can copy your supplier's logo, tone and invoice layout, and spoof a domain that looks trusted at a glance. A careful reader still has to guess. Controls remove the guesswork by blocking spoofed mail before delivery, making a stolen password useless on its own, and forcing payment changes through a second channel.
Six Controls in Priority Order
Table 1. Phishing controls by purpose, effort and owner
| Control | What it stops | Effort | Owner |
|---|---|---|---|
| SPF, DKIM and DMARC on your sending domain | Spoofed messages that use your domain name | Medium, a few DNS records | IT or domain admin |
| Gateway filtering for links and attachments | Malicious links, attachments and unusual sending patterns | Low once enabled | IT |
| Phishing-resistant MFA for email and finance accounts | Credential theft after a user reaches a fake login page | Medium | IT and finance lead |
| One-click report button in the mail client | Lures that sit unreported in inboxes | Low | IT |
| Out-of-band verification for payment or bank changes | Invoice and payroll fraud | Low, a process change | Finance |
| Fake and disposable address blocking on signup forms | Fake sign-ups that pollute lists and invite abuse | Low, one line of code | Marketing or developer |
Start with the first three rows. Email authentication stops other people sending as you, gateway filtering removes the obvious malicious volume before staff see it, and phishing-resistant MFA limits damage when someone does enter a password. Together they cover delivery, impersonation and account takeover, which is where most small-team losses begin.
The next three rows close gaps the technology can't. A report button turns every inbox into a sensor, but only if reporting takes one click. Out-of-band verification stops finance acting on an email alone, even when the message came from a compromised supplier account. Form blocking protects the other direction, keeping disposable and fake addresses out of your CRM before they become deliverability and fraud problems.
If you need a local, practical walkthrough to compare against your own plan, this phishing prevention advice for Houston businesses is a useful cross-check for the order of work. Pair it with these best practices for email security when you assign owners, so controls don't sit in a shared to-do list with nobody accountable.
Practical rule: Name one owner per row in the table. A control owned by "the team" won't get configured, tested or reviewed.
I would put the domain admin, the mail platform admin and the finance lead in the room for the first session. You don't need a security hire for this baseline, and you don't need to finish it in a week. Get authentication, filtering and MFA live first, then add reporting, verification and form checks over the next quarter. Sequencing matters more than buying another tool.
How to Publish SPF, DKIM and DMARC Records
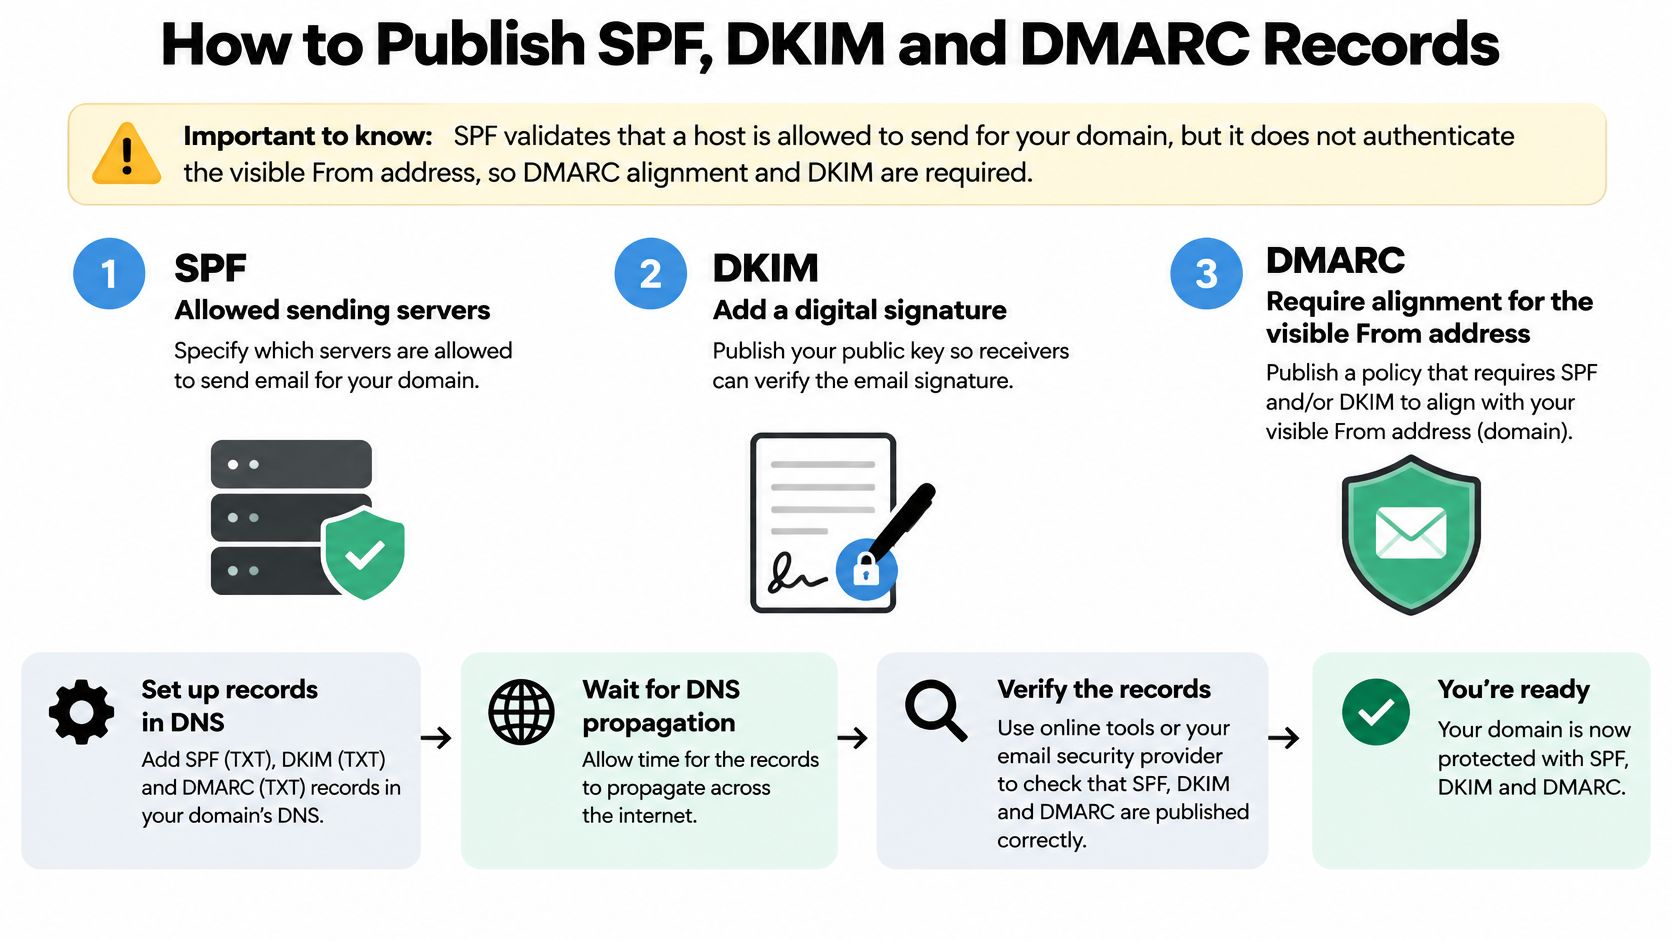
Don't treat SPF as proof a message is legitimate. SPF validates that a host is allowed to send for your domain, but it doesn't independently authenticate the visible From address a recipient sees. NIST's phishing guidance specifically recommends sender-authentication technologies alongside configurable email filtering, user reporting and phishing-resistant MFA, because no single check covers the whole attack.
The visual below shows how the three records fit together before you start changing DNS.
Publishing Steps
- List every sender. Write down every service that sends as your domain, including your CRM, newsletter tool, helpdesk, billing system and payroll provider. Forgotten senders cause most breakage after enforcement, not the records themselves.
- Publish one SPF record. Create a single TXT record that includes those senders and keep it under the 10 DNS lookup limit. Multiple SPF records or an over-limit record will fail, so flatten carefully and remove tools you no longer use.
- Turn on DKIM in each tool. Enable signing inside every sending platform and publish the selector keys each one gives you. DKIM adds a cryptographic signature that receiving servers can verify against your DNS.
- Publish DMARC at monitor. Add a DMARC TXT record with p=none and a reporting address you monitor. This changes nothing for delivery yet, but it starts sending you aggregate reports.
- Fix failures for two to four weeks. Read the reports, find legitimate sources that fail SPF or DKIM alignment, and correct them one by one. Don't rush this stage to hit a deadline.
- Move to quarantine, then reject. Tighten the policy only when legitimate mail passes consistently. That's when spoofed mail starts landing in spam or getting refused outright.
Flag the pitfall after step 2 with your team. A passing SPF result on its own still lets an attacker put your domain in the visible From field from an unrelated server. DMARC alignment is what ties the authenticated domain to that visible address, and DKIM gives DMARC a second way to pass when mail is forwarded.
Table 2. DMARC rollout stages
| Stage | Policy tag | What you check | When to move on |
|---|---|---|---|
| Monitor | p=none | Aggregate reports show every legitimate sender passing | After two to four weeks of clean reports |
| Quarantine | p=quarantine | Legitimate mail still delivers and spoofed mail lands in spam | After a further two to four weeks with no legitimate failures |
| Enforce | p=reject | Spoofed mail is rejected at the receiving server | Keep reviewing reports monthly |
Confirm and Separate Your Streams
Send a test message from each tool, open the original headers in the receiving mailbox, and confirm SPF, DKIM and DMARC all pass with alignment. A simple pass in one Gmail test isn't enough for every sender. This guide to DNS for email helps if you're checking records for the first time.
Keep marketing and transactional mail on separate subdomains, such as news.example.com for campaigns and mail.example.com for receipts and password resets. Publish SPF, DKIM and DMARC on each subdomain and review reports per stream, so a complaint spike on newsletters can't disrupt password-reset delivery. If you're deciding which framework shapes your wider policy work, this overview of choosing between NIST and HIPAA clarifies where formal standards start to apply.
A Ten-Second Check Staff Can Run on Every Request
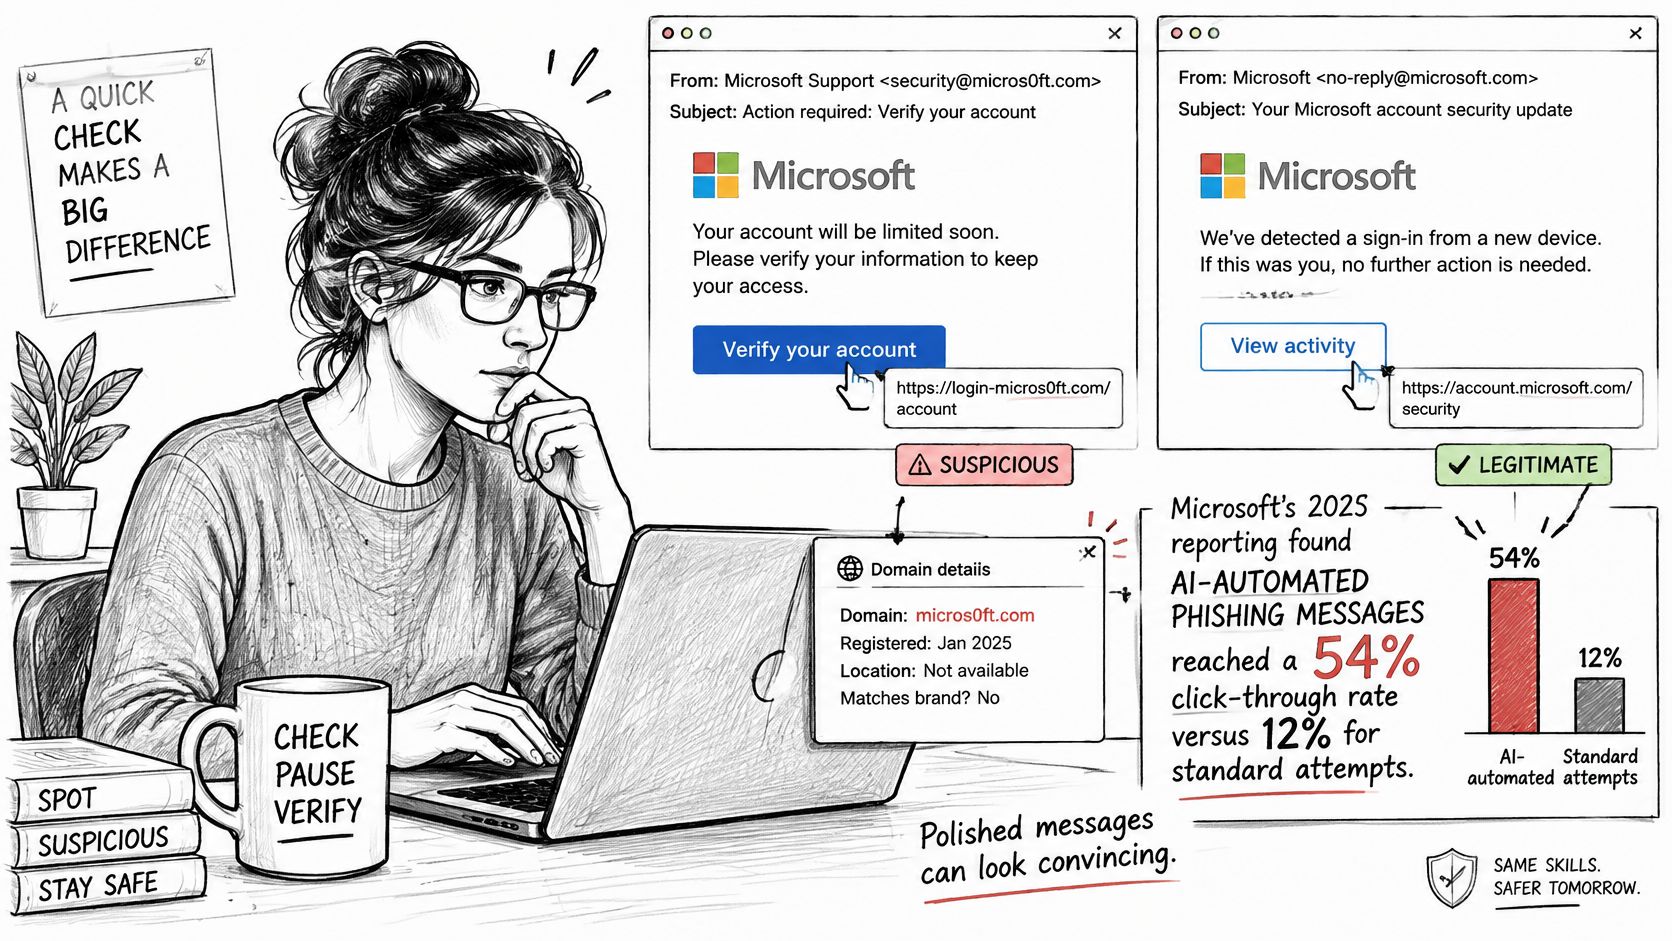
Polished writing no longer proves anything. Microsoft's 2025 reporting found AI-automated phishing messages achieved a 54% click-through rate versus 12% for standard attempts, a 4.5-fold difference. Logos, grammar and familiar context are weak signals, so staff need a fixed routine instead of a judgment call.
The illustration below shows the sender and domain details worth checking before anything else.
The Four Checks
- Read the full address. Expand the sender and read the complete address and domain, not the display name. Display names are free to fake.
- Hover before you click. Compare the destination with the organization you expect, on desktop and by long-pressing carefully on mobile without opening it. This short guide explains how to check email links before clicking without visiting the page.
- Verify high-risk requests elsewhere. For payment, password, payroll or account changes, contact the sender through a phone number or portal you already know. Never reply to the message to ask if it's genuine.
- Report, preserve, then delete. Use the report function, keep the original for whoever handles incidents, and delete it only after reporting.
Never test a suspicious link in a browser to see what happens. A single visit can be the compromise.
Say a supplier emails the day before a payment run asking you to update remittance details. The display name matches, the signature looks right and the invoice number is real. Check 1 shows a lookalike domain. Even if it doesn't, check 3 stops the payment, because finance calls the number already on file and learns the request never came from them.
The short video below walks through that hover-and-compare habit at reading speed.
Add one hard rule on top. Bank-detail changes need two-person approval, with the second person verifying through the known contact, not forwarding approval inside the same thread. That's a process control, not a trust exercise, and it catches compromised accounts that pass every technical check.
Train for Reporting and Measure the Right Numbers
People who had recently received training reported simulated phishing emails at about 21%, compared with a 5% baseline rate. That's the contrast in Verizon's 2025 Data Breach Investigations Report, which analyzed more than 22,000 security incidents including 12,195 confirmed breaches and found human involvement in approximately 60% of breaches. Training works when it changes reporting behavior, not when staff sit through slides.
Run it as recurring practice, not an annual presentation. Use realistic lures staff receive, such as invoice fraud, password-reset messages, delivery notices and executive impersonation. Keep each exercise short, show people exactly where the report button is, and debrief the same week while the message is still familiar.
Metrics That Show Whether It Is Working
Table 3. Phishing program metrics to track
| Metric | What it tells you | Healthy direction |
|---|---|---|
| Reporting rate | Share of simulated and real lures that staff report | Rising |
| Time to report | Minutes from delivery to the first report | Falling |
| Credential-submission rate | Share of simulated lures where staff enter a password | Falling |
| False-report rate | Legitimate mail reported as phishing | Low and stable |
| Time to contain | Hours from first report to removal from every inbox | Falling |
Reporting rate matters first because a fast report lets you warn others and pull the message from every inbox. Time to report shows whether staff act immediately or sit on a suspicious email until the end of the day. Together they tell you if your earliest warning system works.
Credential-submission rate is more serious than a click, because it means someone reached a fake login page and typed a password. A click with no submission and a quick report is a recoverable event. A submission needs an account response, which is why this metric should fall even if clicks don't drop to zero.
Watch false-report rate and time to contain together. A low, stable false-report rate means staff aren't flooding you with newsletters, while falling containment time proves reports lead to action. A rising click rate alongside a rising reporting rate can be healthy, because staff may be surfacing better lures you deliberately sent in a harder simulation.
Close the loop visibly. Tell the reporter when a message was malicious, thank them by name in a team channel if they're comfortable with that, and share anonymized near misses in training. Pay special attention to supplier and partner messages, not just unknown senders, because a familiar company name lowers guard. If third-party lures get reported slowly, train that scenario next.
What to Do After Someone Clicks or Submits Credentials
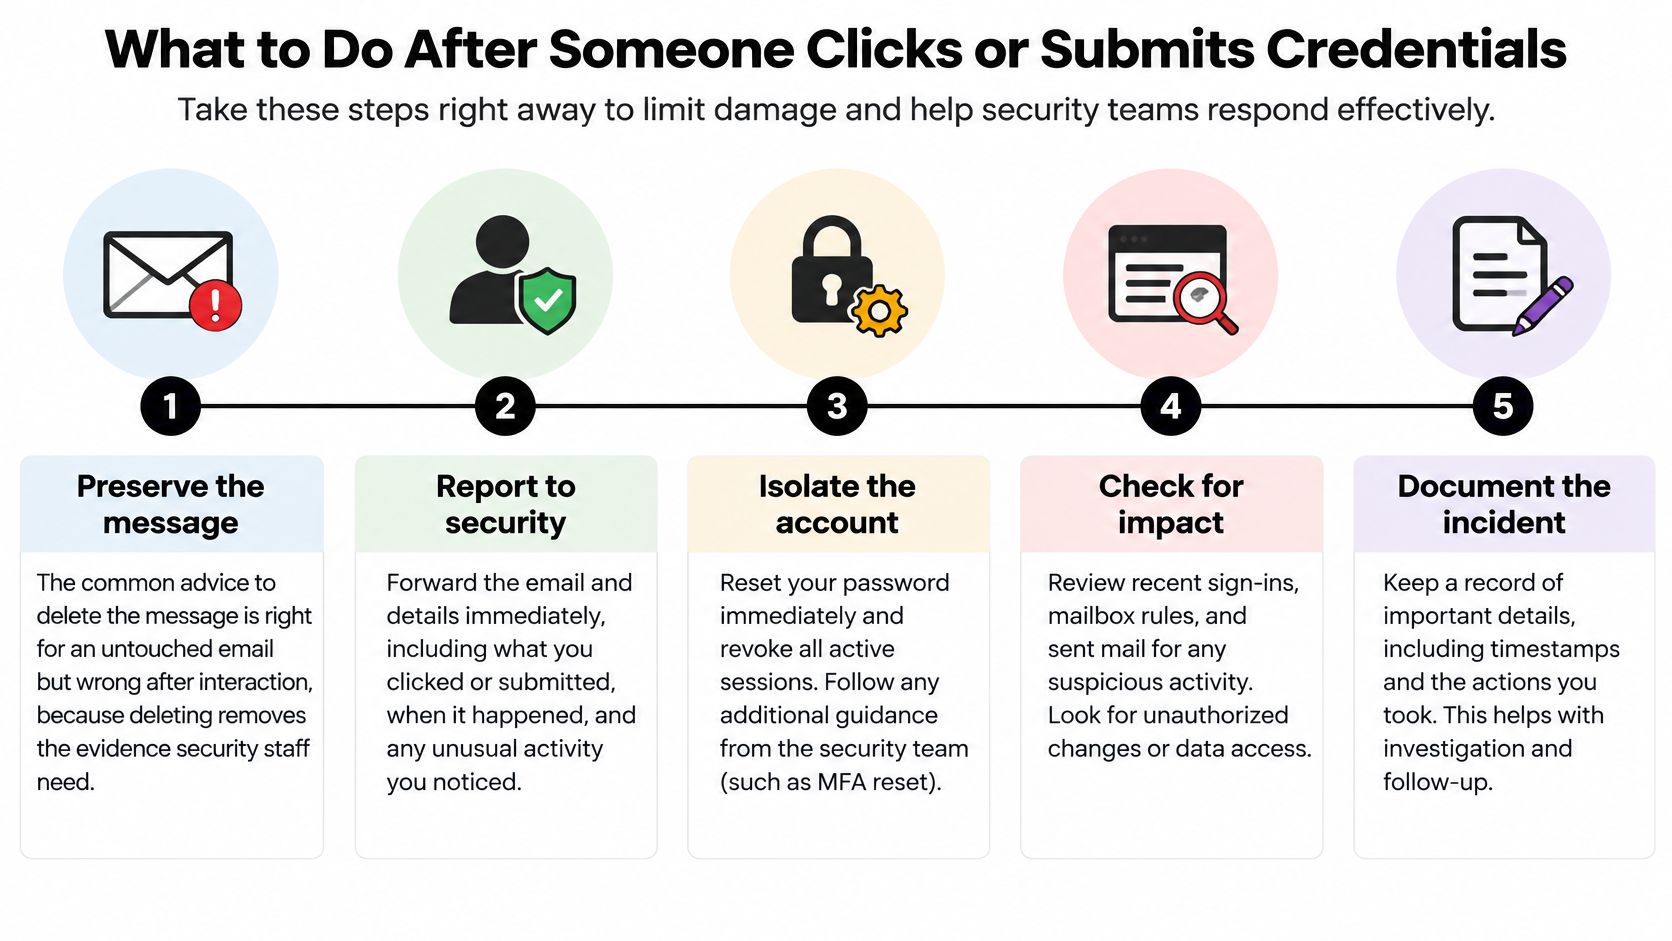
Deleting the message is right for an untouched email, but it's wrong after someone clicked, replied or entered credentials. Deleting removes the headers and links your incident handler needs as evidence. The FTC's guidance on phishing scams covers the consumer basics of not clicking and contacting organizations through known channels, but a business account needs a fuller response after interaction.
The sequence below condenses the first response into steps you can pin above a desk.
First-Hour Incident Path
- Stop interacting. Close the page, don't enter anything else and don't reply. Further clicks only give the attacker more material.
- Report through approved channels. Use the mail platform report function and your internal security channel. Forward the message only through approved mechanisms so headers stay intact.
- Trace who else received it. Search the mail platform's message trace for the sender address and subject line, list every mailbox that received it and remove it from those inboxes. Treat anyone else who clicked as an affected account.
- Change exposed passwords from a clean device. Use a different, trusted device, not the machine that opened the link. Start with email, because mailbox access resets almost everything else.
- Revoke sessions and tokens. Sign the account out everywhere the platform allows. A password change alone may leave an active session running.
- Inspect mailbox rules. Check forwarding and auto-delete rules for anything the user didn't create. Attackers add hidden rules to keep reading mail after a reset.
- Add phishing-resistant MFA. Enroll a security key or passkey on the affected account before returning it to normal use. Don't rely on approving push prompts after a credential theft.
- Notify through verified channels. Contact the bank or service provider using a number or portal you already trust, never a link in the message. Tell affected contacts if the account may have sent mail on your behalf.
Escalation note: If credentials were submitted, assume the account is compromised until sessions are revoked and mailbox rules are checked. Don't wait for proof of misuse.
Rehearse this once a year with the people who would run it, including whoever covers holidays. Time how long it takes to reach revocation, because that's where teams stall looking for admin access. Write down who can reset passwords, who can run a message trace and who calls the bank, then store that page somewhere staff can reach without the compromised mailbox.
Speed matters more than blame. Staff who fear punishment report late or delete the message, and you lose both evidence and containment time. Make the first report a protected, expected action, then handle any training gap after the account is secure.
Confirm Your Setup and Keep Monitoring
Run your first tests this week, not after the next incident. Send a test message from an outside account that spoofs your domain and confirm it's rejected or quarantined once DMARC is at enforcement. Then send legitimate mail from every tool on your sending list and check the original headers until each one passes with alignment.
Monthly Review and Tabletop Test
Name one escalation owner who receives DMARC aggregate reports and user phishing reports, and put a monthly review of both in their calendar. Suppliers change sending platforms without telling you, new marketing tools appear, and reports are where those changes surface first. This walkthrough on how to test email deliverability pairs well with the header checks, since authentication failures show up as delivery problems before anyone calls them security problems.
Run a short tabletop exercise next. A fake supplier invoice reaches a finance inbox, and the team works through the two-person verification and then the first-hour path as if someone submitted credentials. Time both parts. You'll find missing admin rights, an out-of-date bank contact or a report button nobody can locate, and fixing those in rehearsal is cheap.
For signup forms, add a server-side check that rejects malformed addresses and temporary or disposable domains before they reach your list. We flag addresses from known temporary email services that are built to disappear, and adding one line of code to a signup or checkout form catches fake or mistyped emails before they enter the list. Verification stops before any message is sent, so contacts on your list never receive an email from us during checking.
Record results on one page that names the owner for each control, the date each test passed and the date of the next test. Keep it updated monthly. Book the first spoof test this week while the owners are already identified, because an untested reject policy gives confidence you haven't earned yet.
Keep fake and disposable addresses out of your forms while you lock down authentication, MFA and reporting, so bad data doesn't undermine the trust you're building with receiving servers. Visit CleanMyList to clean an existing list before your next send or add a real-time check at signup, and turn the controls in this guide into a setup your team can maintain.